Most of our tutorials thus far have shown you how to add or edit something in your photo project. To spice things up, this tutorial will specifically refer to how to remove things from your project. You can think of this as your Delete Reference Sheet. We’ll start with deletions within the editor, and then move onto a few ways to remove things from your Mixbook account. Removing Items from Within the Editor
Pages To remove a page from your project, you will first need to click on it in the page tray. Next, click on “Remove Page” in the Page Tools box.
 Text, Stickers, and Photos
To remove an element from your project page, click on the element so that its toolbar appears. From the toolbar, click on the red "x" to remove the element. This red "x" is usually the very last button on the right.
 Styles
To remove a style from your element, click on the element, then click on the paintbrush icon. This will bring up the Styles Toolbox. From there, click on the respective styles tab. Located right below the tab will be your removal options: “No Border,” “No Shadow,” etc. Clicking on the text will remove the element. To learn more about styles, check out our entry on all the style tools!
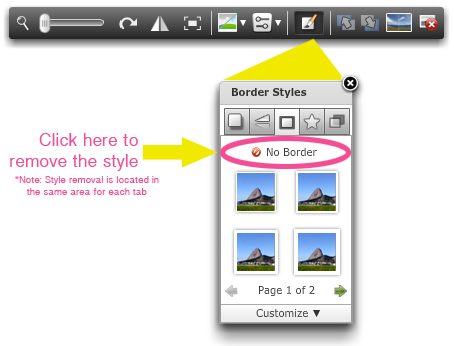 Photo Span
To remove or prevent an element from spanning onto the next page, click on the element. In the toolbar that appears, click on the “Span” button to stop the photo from going onto the next page. Only one side of the button should be highlighted. Point #5 in this post will give you more insight on this feature.

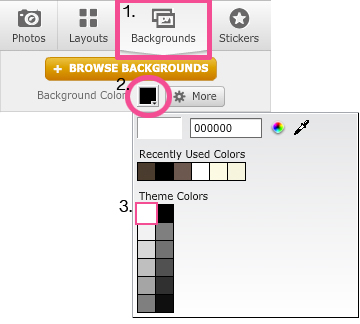
Backgrounds Technically, there is no real way to remove a background. However, if you would like your page to return to a white background, you can follow these steps. 1. Click on the Backgrounds tab 2. Click on the color swatch right below the “+Browse Backgrounds” button 3. Select the color white
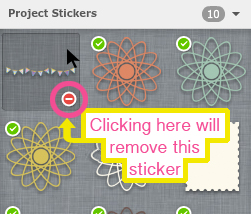
Elements in your Tray To permanently remove photos, or any elements you have personally uploaded, hover your mouse over the photo or element. When the red circle appears, click on it to remove the element from the tray.
Removing or Deleting Your Project From the Your Mixbook Account To delete your project from your Mixbook account, click on the Home tab, then locate the project you would like to delete by scrolling down. If your project has already been published, click the My Projects link located in the lefthand bar, and locate the project on the page that loads. Once you have located your project, you will see a set of different links to the right of it. To delete your project, click on the last link which reads “Delete”. You will then be brought to a confirmation page. If you are absolutely certain you would like to remove this project from your account, click on the “Delete this Project” button.
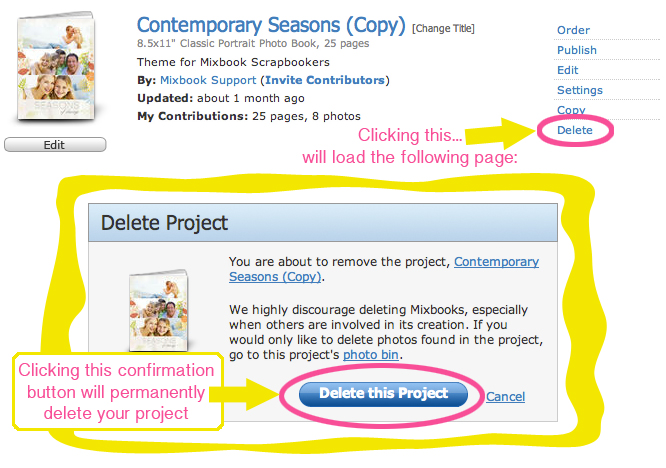 Please note, deleted projects cannot be restored to your account.
Removing Contributors from Your Project To remove a contributor, first locate the project from your Home tab and click on the Settings link located to the right of the project. Click on the Manage link in the Contributors section. To remove the contributor, click on the Remove and Ban link, which will load a confirmation page. If you are certain you no longer want this person to contribute to your project, proceed by clicking the Ban User button.
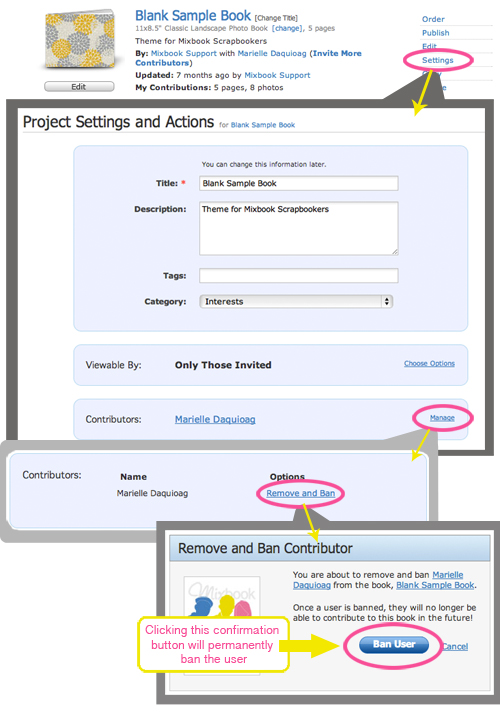 Please note, once a contributor has been banned from a project, they cannot be invited back to the project at a later time. Please ban carefully!
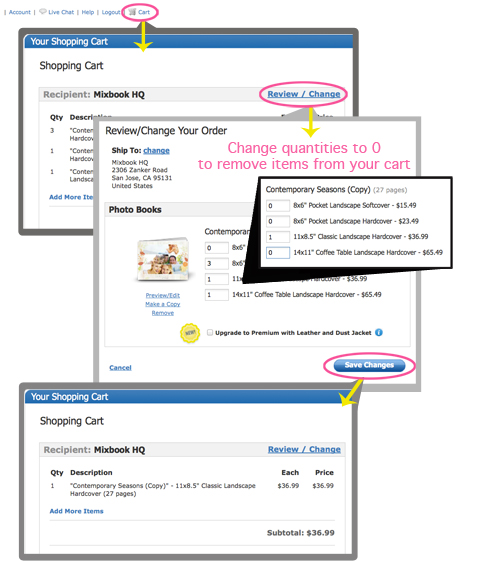
Removing Items from Your Cart To remove items from your cart, click on the Cart link, located in the top righthand corner of the page. Next, click on the Review/Change link, which will load a new page. To remove an item from the cart, change the quantity to 0 (zero) and click the Save Changes button. This will successfully remove the product from your cart.
There you have it! A quick start guide on how to remove just about everything in your photo projects! :) Make sure to bookmark this page (or pin it!) for future reference. Happy Mixbooking!

