The Ultimate Guide to Digital Photo Organization
The Best Way to Organize Photos on Your Phone
What’s the first step in creating a digital photo album? Organizing all your special photos! One of the main reasons some users may delay the start of their next photo project is due to the fact that they just have so many photos, they don’t know where to begin. Although the task may seem daunting, once you get started you’ll have everything you need, organized neatly in folders, and all those unnecessary shots archived or recycled. Photos on your phone can take up a lot of storage if not clean up regularly. The other fear is, what happens if you lose your device? Let’s go through all the ways we recommend organizing and backing up your precious memories.
General Organization Tips for Mobile Photos
There are some helpful tips to get you started no matter which type of device you have. It’s a general rule of thumb, to begin with, scrolling through your photo library and delete and favorite the photos you’re sorting through. After the initial step, start making folders based on occasions or topics. For example, all your “Food” photos, title a folder “Rover” for your endless shots of your fur baby, or “Cancun 2018” to separate vacation shots.
Don’t forget to back up your photos! It’s always a good idea to create backups of your photo memories in case you lose your device or have issues transferring your data to a new one. There are a couple of ways to back up devices. We suggest your device’s cloud storage system or a hardcopy on your desktop computer.
How to Organize Photos on iOS devices
If you have an iPhone or iPad, this part speaks to you. Ever since Apple has made the iPhone camera better and better, we’ve taken more photos. You probably have screenshots, pet photos, old vacation photos, and more just waiting to be sorted. Take a deep breath, we’re doing this together. After you’ve done your initial homework of deleting and favoriting photos, you’re ready to take the next step.
Create a photo album
Imagine having all your photos sorted into neat digital folders that are easily accessible. Yes, please!
Let’s create a folder on your iOS device:
Open the Photos app, then tap the Albums tab at the bottom
Tap the + in the top left corner, then create a New Album
If you want to create an album from a set of existing photos:
Open Photos app, then tap Library or Recents (if in the Albums tab already)
Tap Select in the top right corner, then pick all photos you want to organize. Then tap the arrow box in the bottom left to bring up the share window.
Tap Add to Album and name your new album.
Create a Favorites photo album
Sort those little hearts into their own album.
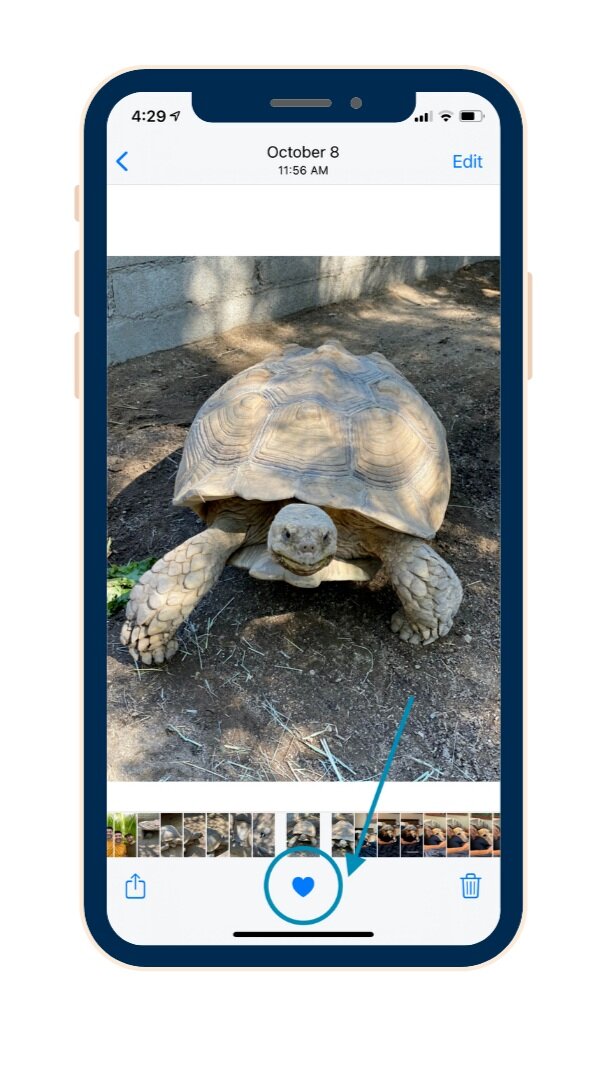
Open Photos app, then tap Library or Recents, tap a photo, then tap the Heart Icon at the bottom of the screen
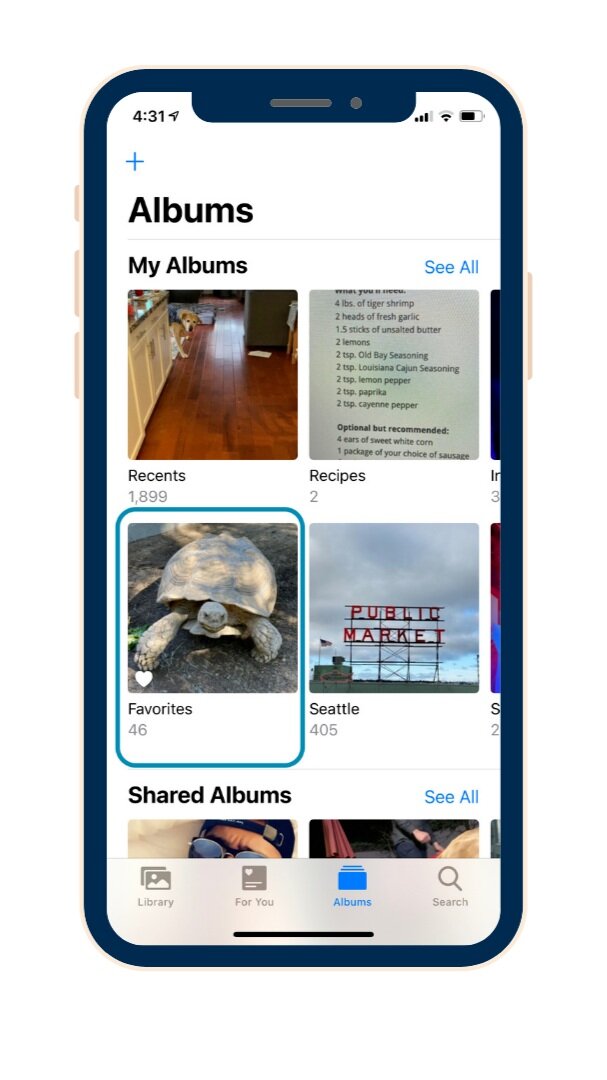
All selected photos will move to a Favorites album automatically
Sort by Faces
Facial recognition is a great way to sort photos by certain individuals.
Open a photo with a person’s face in it, and Swipe Up on the photo
Tap the Circle with the person’s face, then tap Add Name at the top
You can access People and Places on your Albums tab.
Once you assign a name to faces, your phone will automatically sort these individuals into their respective folders for future photos.
Use the photo search function
Apple makes it easy to find a photo by identifying objects, people, places, and even animals in a photo.
Open Photos app, then tap on the Search icon in the bottom right corner
Type in any noun (i.e. - “dog”, “salt lake city”, or Christopher) and watch the results populate like magic.
Once you’ve finished organizing your camera roll. You’re ready to import your photos and create a Mixbook project.
When you select Add Photos in our Editor. Click Add by Phone. Follow the instructions and import them from your newly organized albums!
How to Organize Photos on Android devices
Google Photos is better.
Add the Google Photos app to your home screen for easy access
Swipe up on your home screen to see your apps, then tap Google folder
Press and hold Photos and then drag it to you home screen
Searching and Finding Photos.
Photos by person or pet are grouped with each other.
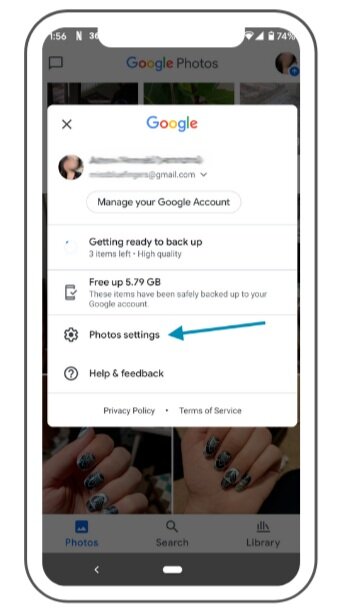
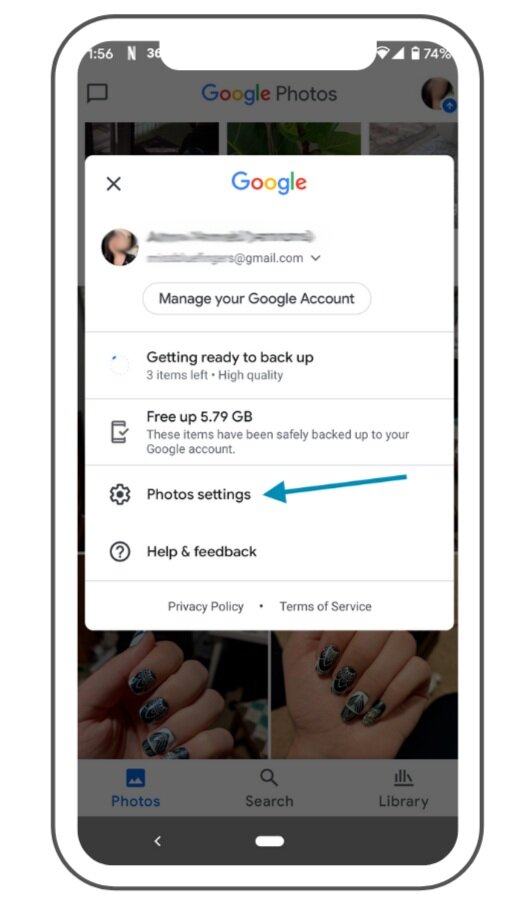
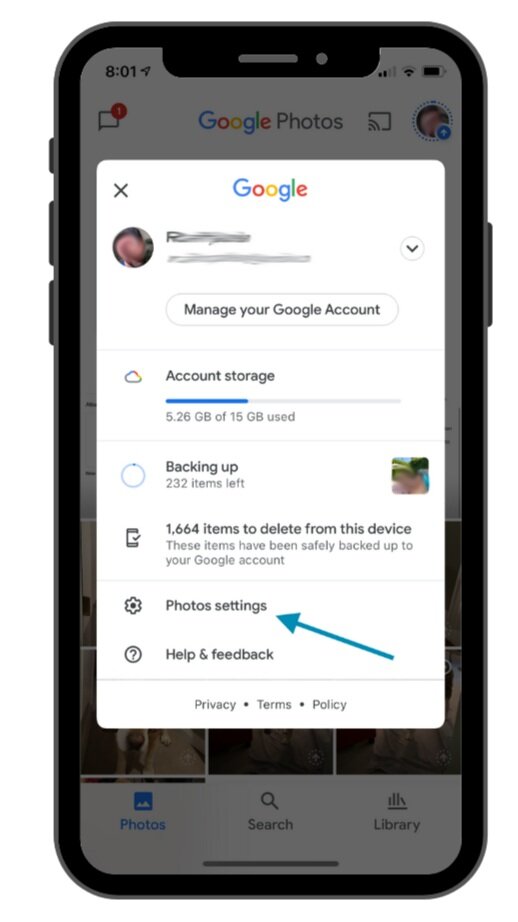
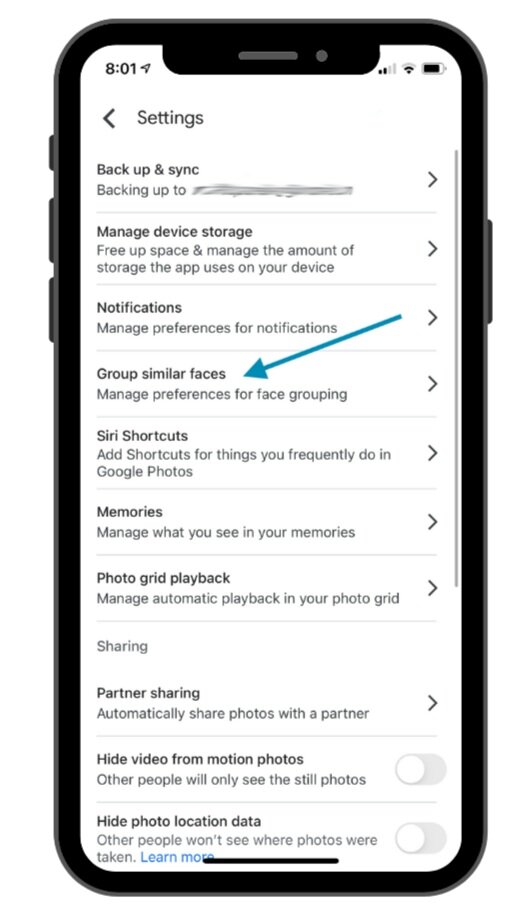
In the Google Photos app, select your avatar icon in the top right corner, and then tap ⚙ Photos Settings
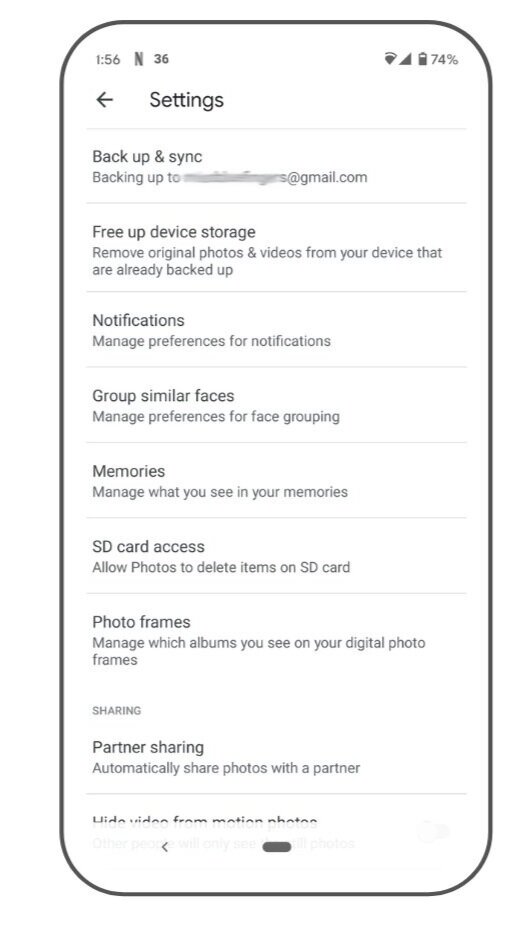
From there, tap Group similar faces and then turn on Face Grouping
How to label people and pets
In the Google Photos App, tap inside the 🔍 Search icon at the bottom of the screen. The search tab will open. The top row will be called People & Pets.
Tap View All to view all faces. Once there, tap on the face.
On the next screen, tap “Add a name” under the circular photo at the top. Then, in the text box, type, or select a name.
How to find the photos you’ve labeled
Open the Google Photos app, then tap the 🔍 Search icon at the bottom of the screen.
Type in the search criteria, then scroll through results for your photo (for example, search “beach” and all your photos from your trip will show up)
How to protect your photos
Backup & sync your photos to the cloud for safekeeping.
Open the Google Photos app, then tap your avatar icon in the top right corner
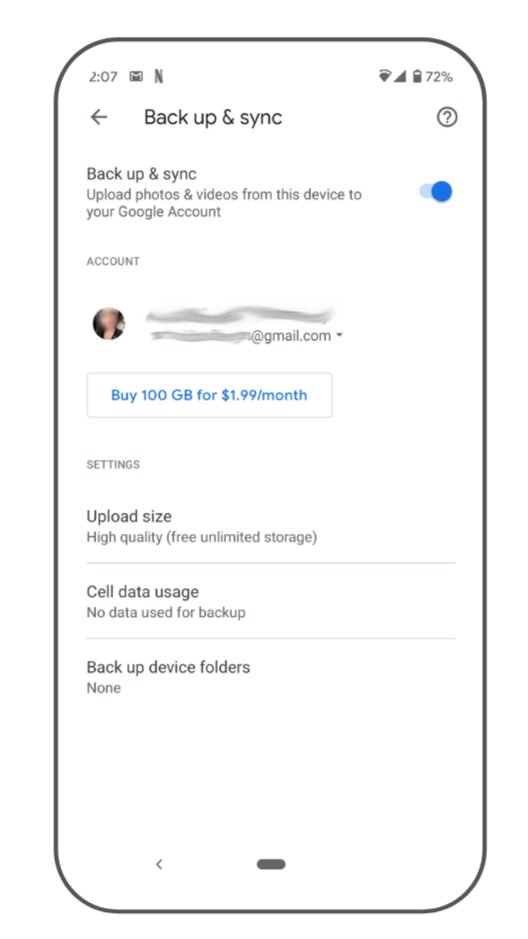
Tap Photos Settings, then select Back up & sync and Toggle On
As a default, Google Photos will compress your photos to save space and allow more storage. If you’d like to keep your photos at their full resolution, you’ll want to change the settings. Here’s how:
How to back up photos using high quality
Open Google Photos app, then tap your avatar icon in the top right corner
Tap Photos Settings, then select Back up & sync
From there, tap Upload Size and then tap High Quality
Organizing Photos with Mixbook’s My Photos
Did you know Mixbook offers FREE unlimited photo storage? It’s one of the best reasons to use our My Photos feature. My Photos helps keep all your uploaded photos in one place for use in future projects.
To access and keep your photos organized on My Photos. Click My Photos at the top of your screen next to My Projects (on desktop).
From here you can view your photos by timeline or by albums that you’ve created. In Timeline view, you can sort by the drop-down menu at the top right. You can sort by the date the photo was taken or by when you added the photo to your project.
Using My Photos to first organize your photo uploads will help get your favorite photos in order prior to getting a big project started. This is especially helpful for photo books that span across time such as a year in review, family history, or birthday milestone books.
Create a folder in My Photos
Click the Albums tab and then click Create New Album
Upload or Add Photos to Your Album
Once you’ve created your new album, it’s time to get organized! You can add photos to albums in two different ways. The first way is from your Timeline tab. Switch over to your Timeline tab and click either entire dates or specific photos that you want to move into your albums. Once you begin selecting photos you’ll notice the action tray pop-up at the bottom of the screen.
Once you’ve selected all your photos, click More Options. Now select Add to Album and choose which folder to send these images to.
The second way to add photos to folders is upon album creation. You’ll see an Upload Photos option.
You can import photos from your desktop or from the social media integrations listed above.
Starting Projects from Albums
Now that you’ve gotten all your photos sorted into albums, you can start a project from said album. To do that, select the Albums tab and click Album Options. Under Album Options you’ll have the option to also delete the album.
You can add these photos to existing projects or begin new ones. If you choose Add to Project you’ll get a pop-up window on the right where you can choose which project to send your images to.
If you choose to create a new project, such as a photo book you’ll be taken to select your chosen theme and then you can begin. Home decor projects will upload immediately as they don’t have “themes”.
The Best Photo Organization App
If you’d like to use an application to keep your photos organized we recommend Google Photos. A fan favorite by both iOS and Android users, Google Photos provides the best photo storage and organization features for the everyday photographer.
Developer: Google LLC
Price: Free (With storage limits)
Download (Android): Google Photos
Download (Apple iOS): Google Photos
Did you know? - You can sync your Google Photos to Mixbook and import your photos directly from the app!
With Google Photos you can manage your photo library across all your devices. Google offers their application for mobile/tablet devices and for use on the web on desktop computers.
How to Use Google Photos
Here are the basic instructions to getting the most use from the Google Photos app and getting organized.
When you launch the app you’ll be in Photos view. This is where you can see your most recent photos and past memories.
The middle tab is the Search tab where you can quickly search through your photos by typing in any nouns like “Sandra” or “Pizza”.
The third tab to the right is the Library tab. You can access your Albums, Favorites, Archives, and Trash in your Library.
While you’re in your Library tab, go ahead and create an Album by clicking the New Album + sign.
Adding Photos to Albums
The best way to get your photos into Google Photos account is via backup and sync.
Your phone can be set to automatically upload photos to Google Photos. This makes it so easy to auto-upload photos as you snap them.
How to turn on the backup
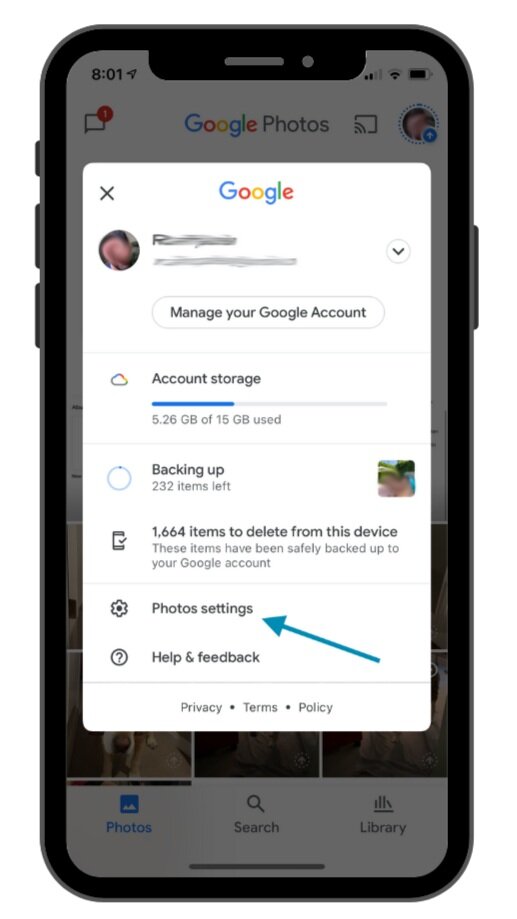
Open your Google Photos app and tap on your photo or initial in the upper right corner of the app.
Tap Photos settings (the gear icon).
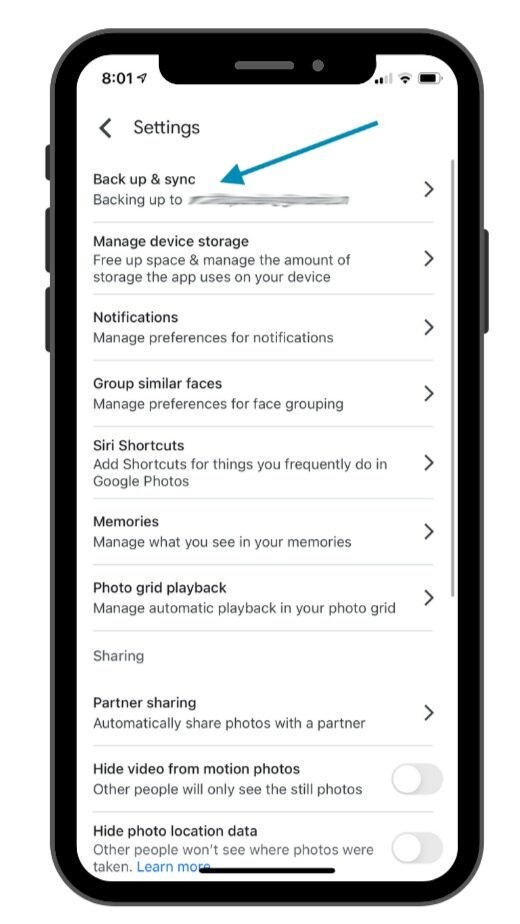
The first option is Backup & sync. Toggle to activate backup & sync.
Let’s start filling your albums. To fill your new album, head over to the Photos tab. Begin selecting your photos by either tapping on an entire date to select all photos within a date stamp, or tap and hold to select individual photos. When you are done with your selection, tap the + sign at the top. Then choose to either add to a new album or add to an existing album which you will see at the bottom.
How to Name People and Pets
Google Photos facial recognition can help you sort photos by scanning the faces of your friends, family, and even pets. Let’s begin by turning on your Face Grouping and Show pets with people feature to include furry family members.
Open your Google Photos app and tap on your photo or initial in the upper right corner of the app.
Tap Photos settings (the gear icon).
Tap Group similar faces, then toggle on Face Grouping and Show pets with people
Tap over to Library and you’ll see People and Pets at the top. You assign names by tapping their faces and adding a name. Visit our Android section above for the same instructions.
How to Import Google Photos albums to Mixbook
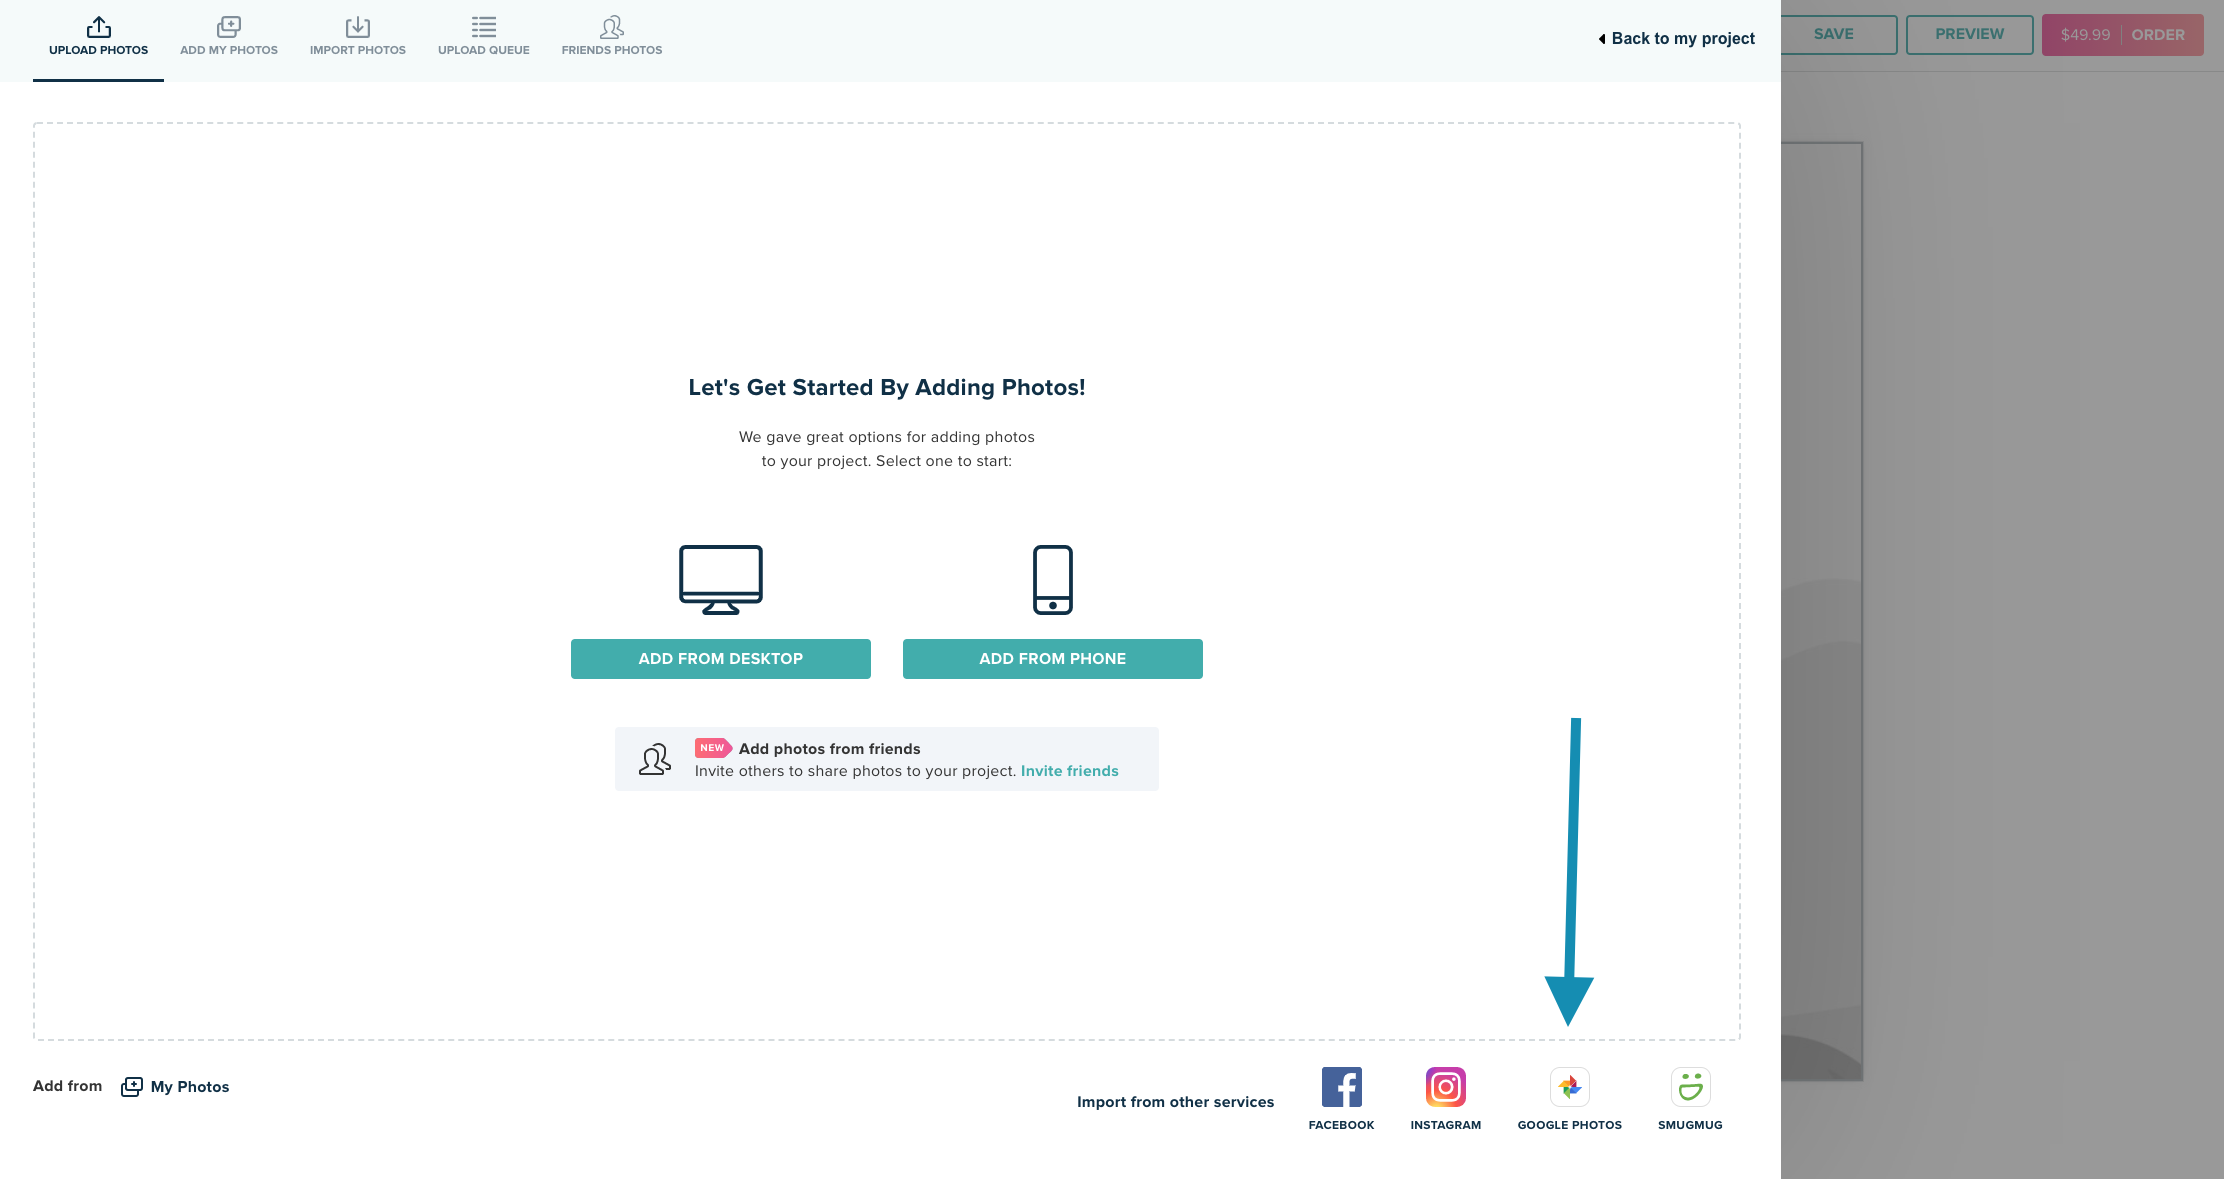
To upload photos from your newly organized Google Photos, click Add Photos, and then select Google Photos on the upload window.
Log into your Google Account and allow access to your Google Photos. Now you’ll see all your Google Photo images and folders ready for import. You can also upload to your My Photos the same way, prior to starting projects.
How Do You Organize Your Photos?
Wow we’ve gone through so many great ways to organize your photos, tell what works best for you. We love learning all kinds of new tricks to getting ready for photo projects. Whether you use your device or apps like Google Photos, the key to organizing your photos is consistency. Make it a habit to delete, favorite, and sort photos monthly to keep up with your shutterbug habits. By the time you’re all set for a new photo book project, you’ll be thanking yourself for staying organized. Happy snapping!


